Setting up time reporting policies and projects
The time reporting feature is always disabled per default and needs to be enabled by Customer Support.
To create a new timesheet policy, navigate to Settings → Time reporting settings
You will see a tab with timesheet policies and one for projects. To create a new policy, press the button “New timesheet policy”
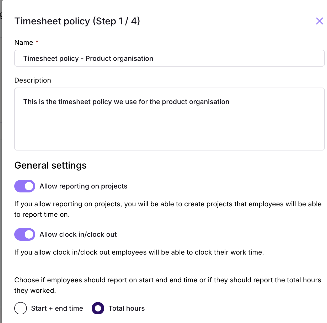
Step 1/4: Fill in the information
Name: name your policy, e.g. General, Hourly employees, Consultants etc.
Description: give your policy a description e.g. This policy should be used for Hourly employees
Allow reporting on projects: this allows the employees to report time on projects
Allow clock in/out: this allows the employee to clock in when they start working and clock out when they end their day
Start + end time/Total hours: select if the employees should report on
Start/end time - ex 08:00 - 17:00
Total hours - ex 8 hours
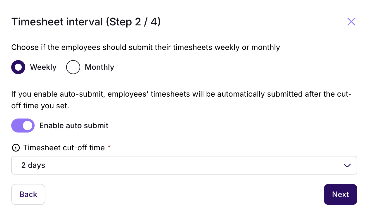
Step 2/4: Timesheet interval
Weekly/monthly submission: select if employees should report hours on the interval week or month
Auto submit: If you enable auto-submit, employees' timesheets will be automatically submitted after the cut-off time you set.
Timesheet cut of time: how long after the timesheet’s last day should the timesheet be automatically submitted
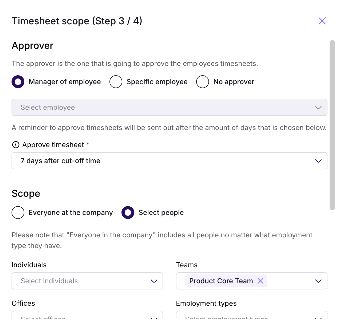
Step 3/4: Timesheet scope
Approver: choose who should be the one approving the timesheet’s, here you have three options
- Manager of the employee: report to hierarchy
- Specific employee: choose a specific employee that should approve the timesheets
- No approver: the timesheets will be automatically approved
Approve timesheet: after how many days a reminder should be sent out to the approver
Scope: who should be included in the timesheet policy
- Everyone at the company
- Select people: select the employees (individuals/departments/offices etc), that should be included in the timesheet policy and should be the ones reporting the hours
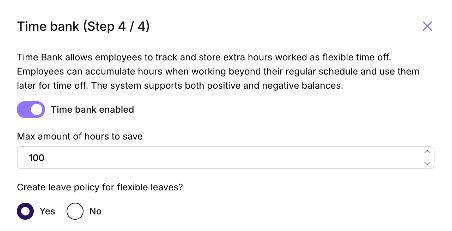
Step 4/4: Time bank
Enable time bank: Select if a time bank should be enabled. Time Bank allows employees to track and store extra hours worked as flexible time off. Employees can accumulate hours when working beyond their regular schedule and use them later for time off. The system supports both positive and negative balances.
If enabled:
Select how many hours the employee can save
Do you want to create a leave policy for flexible leaves?
No: no leave policy will be created, and employees will not be able to apply for flexible leave
Yes
Create the leave policy and add
Name
Description
Minimum time to request
If the leave should be company visible
If it requires approval
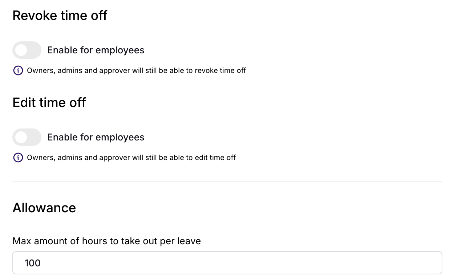
If employees should be able to revoke flexible leave
If employees should be able to edit a flexible leave
Allowance: how many hours the employee can take out per leave

Some of the fields in the policy can be edited, to edit a policy press the three dots in the table and choose to edit. The fields that can be edited are:
- Name
- Description
- Enable auto-submit
- Approver
- Approve timesheet time
- Scope
- Details for leave type flexible leave
You can archive a timesheet policy from the three dots in the table. You will be able to delete a timesheet policy when the policy is in edit mode.
Projects in time reporting
A project is used for organisations who wants their employees to report hours on different projects.
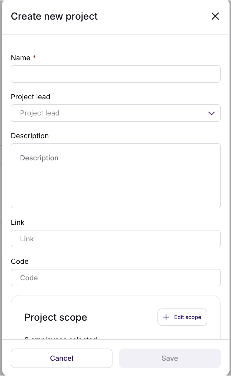
To create a project, navigate to Settings → Time reporting settings → Click the button “Create project”
Fill in the information:
- Name
- Project lead
- Description
- Link
- Code
- Add scope: which employees should be able to report on the project. The project is only visible to the people in the scope.
To edit or archive a project press the three dots in the table. When a project has been archived you will be able to delete it.
Was this article helpful?
That’s Great!
Thank you for your feedback
Sorry! We couldn't be helpful
Thank you for your feedback
Feedback sent
We appreciate your effort and will try to fix the article