TABLE OF CONTENTS
- 1. Conversation lifecycle at a glance
- 2. Your workspace: Team overview
- 3. Starting a conversation
- 4. Preparing your reflections
- 5. After both have submitted
- 6. Closing the conversation
- 7. Conversation Rounds
- 8. Templates
- 9. Visibility rules and sharing
1. Conversation lifecycle at a glance
For a quick overview of how a conversation flows from start to finish — from creation through preparation, sharing, closing, and signing — see the lifecycle section in the Administrator Guide (or the Introduction to Reviews & Check-ins).
The rest of this guide focuses on what you do as a manager at each stage of that flow.
2. Your workspace: Team overview
Team overview is where you'll find all the conversations where you're the reviewer. It's your starting point for creating new conversations and following up on ongoing ones.
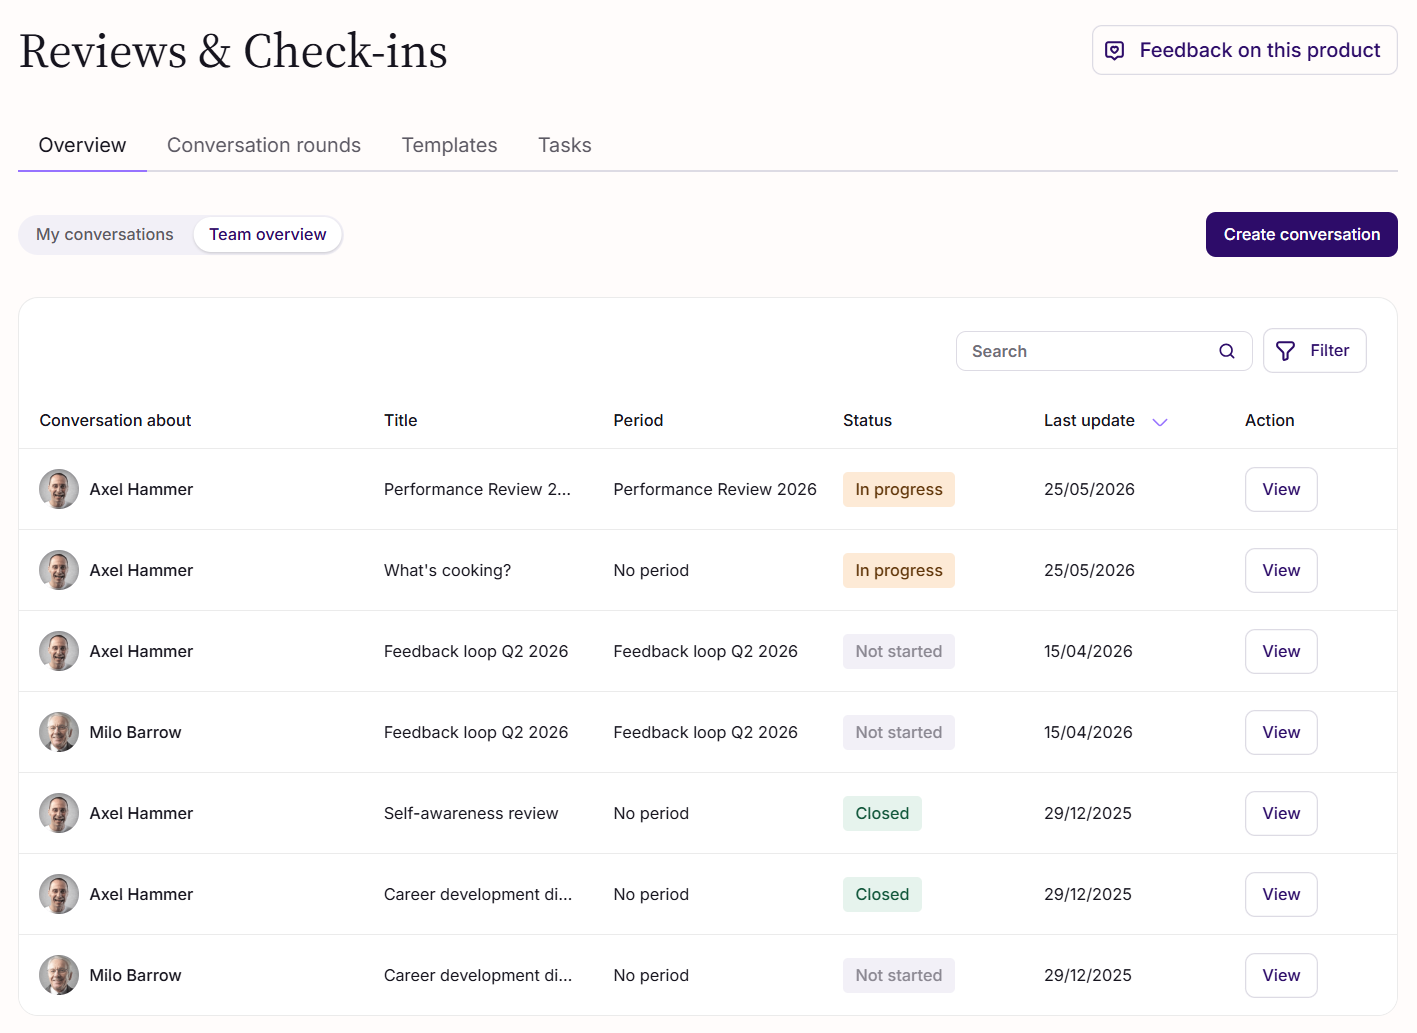
The conversation list
Each row in the list shows:
Conversation about — the employee
Title — the conversation title (you can edit this later)
Round — the Conversation Round it's linked to, if any
Status — the current stage of the conversation
Last update — when the conversation last changed
Action — a button to take the next step, depending on the status:
Respond — you haven't submitted your reflections yet
View — no action needed from you, but you can open the conversation
Finding a conversation
For quick navigation:
Sort the list by clicking any column header. By default, conversations are sorted by Last update (newest first).
Filter by status or round.
Search by conversation title, template, or employee name.
Creating a new conversation
Click Create conversation in the top right to start a new conversation. See Starting a conversation for the details.
3. Starting a conversation
To start a conversation, click Create conversation from the Team overview.
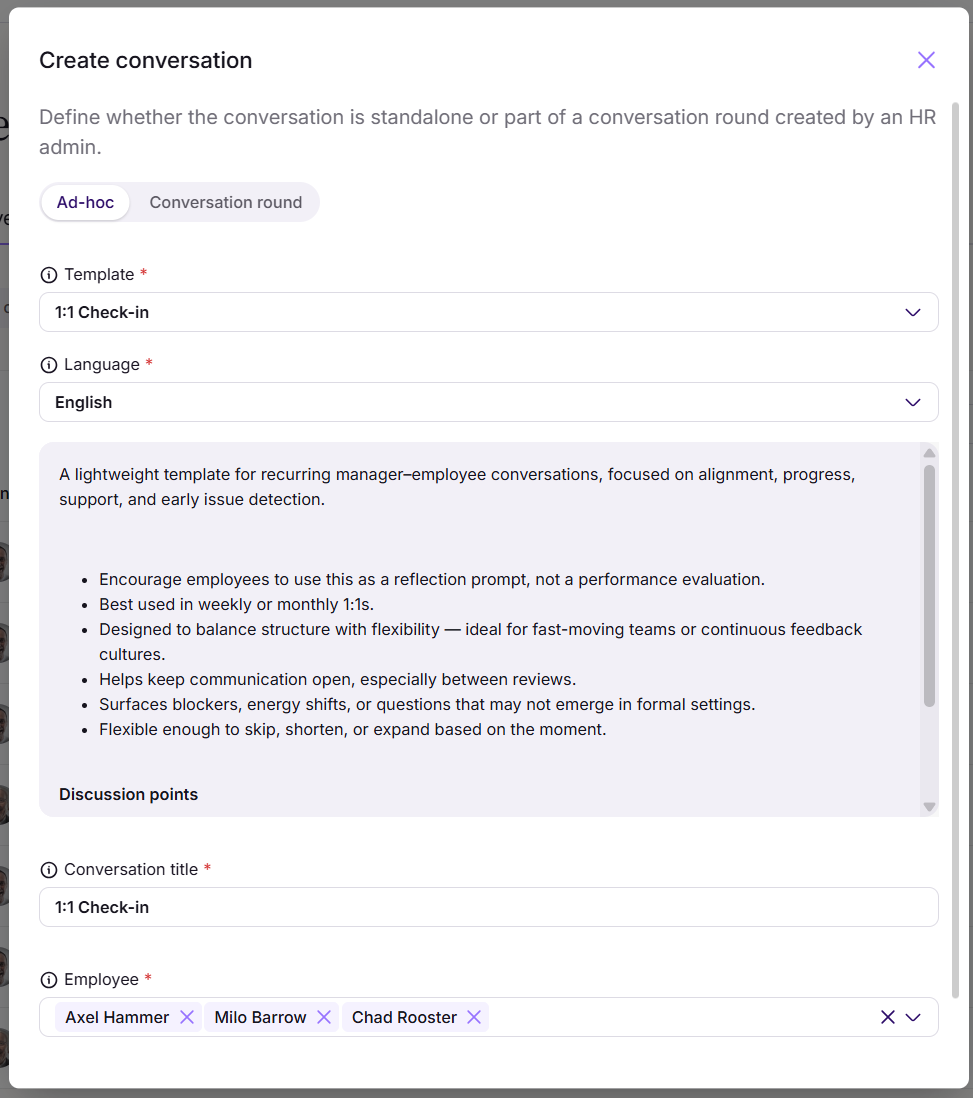
Ad-hoc or Conversation Round
At the top of the modal, choose the type of conversation:
Ad-hoc (default) — a standalone conversation, not linked to any round. Use this for 1:1 check-ins, growth conversations, or any discussion outside a structured round.
Conversation round — link the conversation to an ongoing or upcoming round. Only rounds where you have employees in scope are shown. When a round is selected, the template is pre-filled from the round and cannot be changed.
Template
Pick the template that fits the conversation. You can expand each template to see its description and discussion points.
For ad-hoc conversations, you can choose from all enabled templates — including your own personal templates.
Language
If you've selected a Simployer template, choose the language. The language applies to both you and the employee, regardless of their personal language setting. Only languages supported by the selected template are shown.
Title
The conversation title makes it easier to recognise later in your lists — especially when you have several conversations with the same employee.
The title is pre-filled with the template name. You can edit it to add context, for example "Q1 Check-in — January 2026".
When creating conversations for multiple employees at once, all of them get the same title. You can change the title individually for each conversation later.
Selecting employees
Pick one or more employees. Each selected employee gets their own separate conversation.
All active employees in the organisation are available — your direct reports appear at the top of the list.
Use the Select all direct reports button to add your whole team in one click. It replaces anything you've already selected, and you can deselect individuals afterwards if someone shouldn't be included. The button is only shown if you have direct reports.
If you select employees who aren't your direct reports, you'll see a confirmation warning before the invites are sent. This helps avoid mistakes when picking from a long list.
Sending the invite
Click Send invite to create the conversation(s). The employee receives an email notification letting them know they can start preparing.
4. Preparing your reflections
Once a conversation is created, both you and the employee prepare independently. You write your own reflections on each discussion point, without seeing what the other has written — this opens up only when both have submitted.
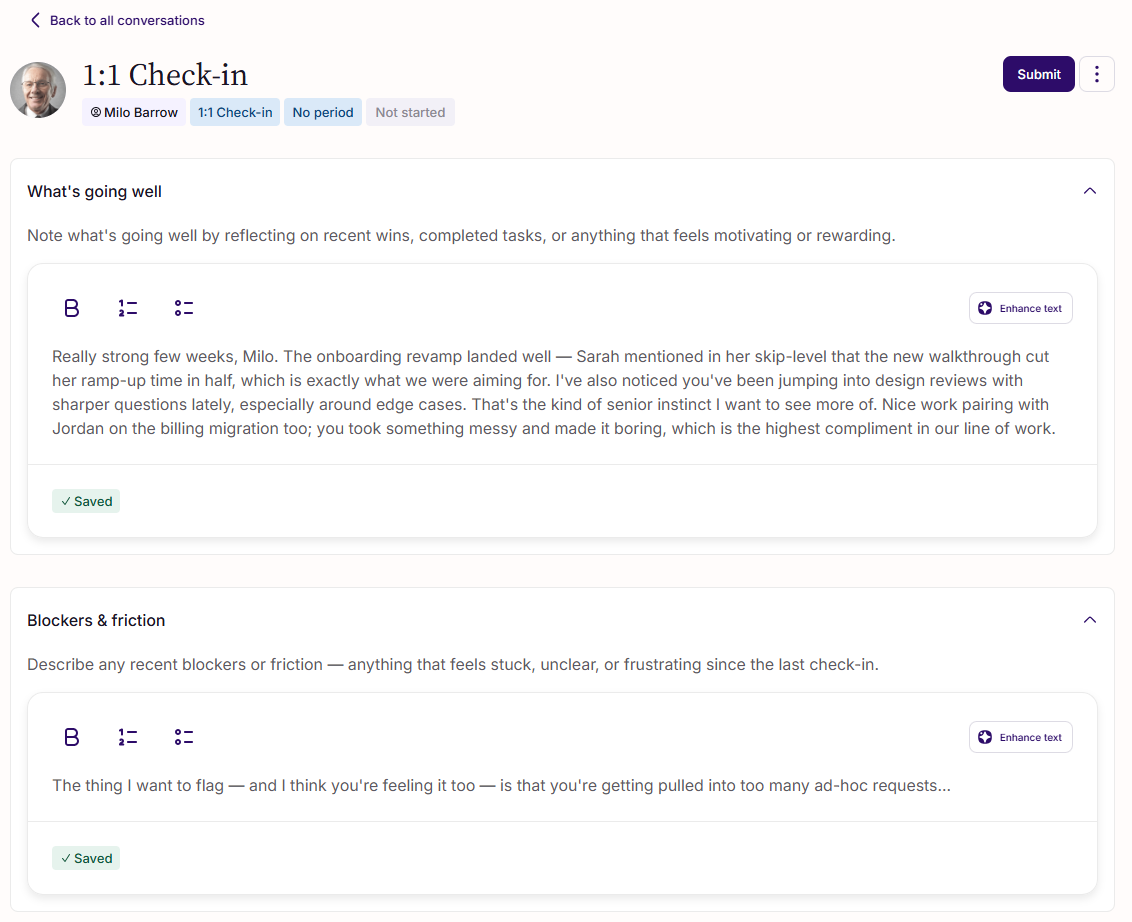
Writing your responses
From your Team overview, click Respond on the conversation to open the response form.
Each discussion point has its own text field where you write your reflection.
Your input is auto-saved as you write, so you can come back later to finish. Nothing is shared with the employee until you submit.
Getting help from AI
If you'd like to refine what you've written, click the Enhance button next to your response. A window opens with your original text and following options:
Rephrase
Fix spelling & grammar
Make longer
Make shorter
Translate
The AI knows which discussion point you're working on and tailors its suggestion accordingly. You can apply the suggested change or keep your original — your choice.
Submitting
When you're ready, click Submit.
You don't have to answer every discussion point — but if you skip any, you'll see a warning before submitting. You can choose to submit anyway.
Once you've submitted, your responses are locked. You can't undo a submission, but you'll be able to clarify or expand on anything through comments once the conversation is shared.
Tip: You'll see a Prepare for Conversation task in your Action Hub as long as you haven't submitted. It disappears automatically once you do.
What happens next
If the employee hasn't submitted yet, the conversation waits for them.
If they have already submitted, the conversation becomes shared as soon as you submit — and both responses become visible side-by-side.
Note: If your administrator has enabled the Early access for reviewer setting, you can see the employee's responses as soon as they submit — read-only, while you're still preparing your own. This is one-way: the employee still can't see your responses until you've submitted. The conversation status stays In progress, and comments, tasks, and the AI summary remain unavailable until you've also submitted.
5. After both have submitted
Once both you and the employee have submitted, the conversation moves into its collaborative phase. This is where the actual discussion happens — supported by comments, tasks, and an optional summary.
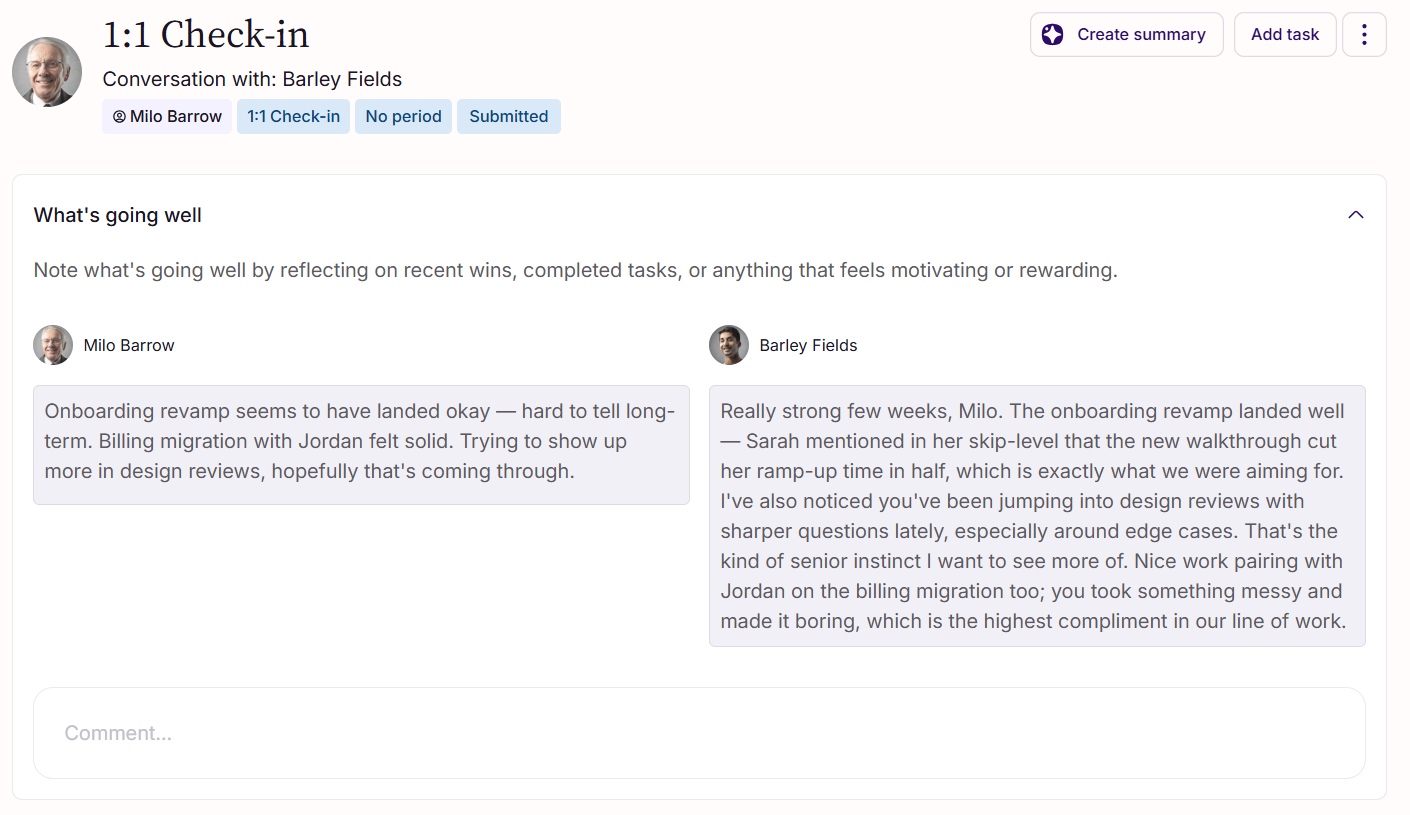
Side-by-side view
Responses become visible to both of you, presented side-by-side:
Left side — the employee's reflections
Right side — your reflections
Each discussion point shows both responses next to each other, making it easy to compare perspectives during the conversation.
Comments
Below each discussion point, both of you can add comments. Comments are useful for:
Clarifying or expanding on a response
Capturing notes during the live conversation
Agreeing on conclusions or next steps
Each comment is shown with the author's name and a timestamp, and is visible to both participants immediately.
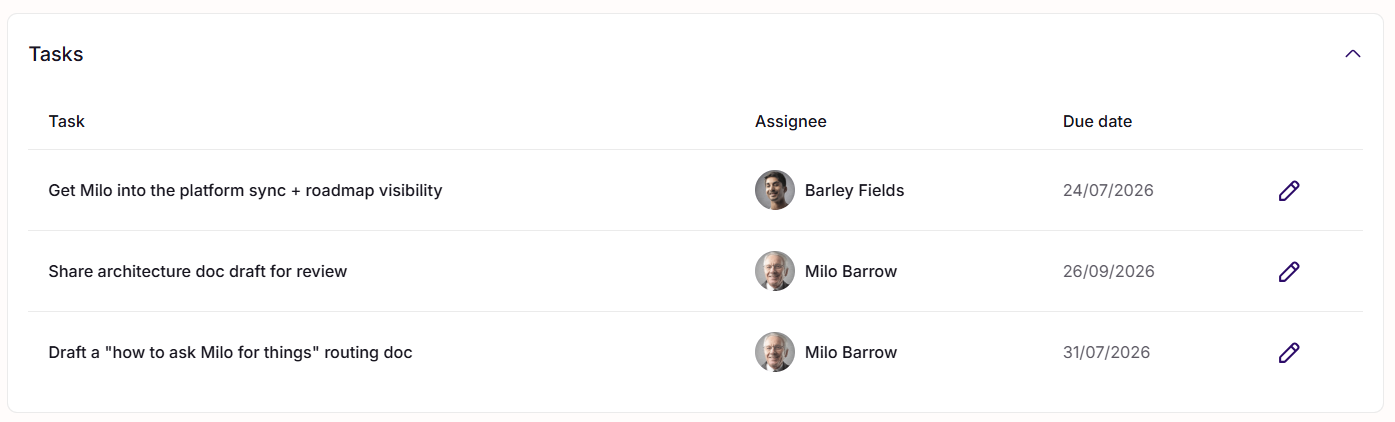
Tasks
You can build an action plan together by adding tasks to the conversation.
Each task has:
Title (required)
Description (optional)
Assignee — either you or the employee
Due date (optional)
While the conversation is open, tasks are in draft mode — both of you can add, edit, or delete them, and they don't appear anywhere else yet.
When you close the conversation, tasks become finalised: they appear in the employee's task list and in the conversation's task overview, and can no longer be edited. After that, they can only be marked as Done or Todo.
AI-generated summary
Either of you can generate a summary that captures the key points from the conversation.
Click Generate summary to produce a draft based on the responses and comments. The summary is editable — you or the employee can refine the wording, and changes are auto-saved.
You can also get AI help while editing the summary, using the same Enhance options available for responses: Rephrase, Fix spelling & grammar, Make longer, Make shorter and Translate.
A summary is optional. If you'd rather not have one, simply leave it empty — or remove a generated draft if you change your mind.
Tip: While the conversation is in this stage, you'll see a Complete the Conversation task in your Action Hub as a reminder to wrap things up. It disappears automatically once you close the conversation.
6. Closing the conversation
When the discussion is complete and everything is captured, you close the conversation to mark it as done.
Closing the conversation
Click Mark as closed to close the conversation. Closing it:
Locks all content as read-only — responses, comments, summary, and tasks
Finalises the tasks — they move out of draft mode and into the employee's task list
Notifies the employee that the conversation is ready for them to review and sign
If you close without a summary, you'll get a reminder — but you can choose to proceed anyway if no summary is needed.
What the employee does next
After you close, the employee receives a notification asking them to review and sign the conversation. Signing is their acknowledgement that they've taken part of the content. You don't need to do anything at this stage.
Re-opening a closed conversation
If you realise something needs adjusting after closing, you can re-open the conversation. This sets it back to the shared state, where:
Comments can be added or changed
The summary can be edited
Tasks remain read-only — they were finalised at the moment of closing and stay that way
If the employee had already signed, the sign-off is invalidated. They'll need to sign again once you close the conversation a second time.
7. Conversation Rounds
Conversation Rounds are set up by administrators to run structured conversations across the organisation — for example, an annual performance review or a quarterly check-in cycle. As a manager, you take part in rounds by creating and running conversations for the employees in your team who are in scope.
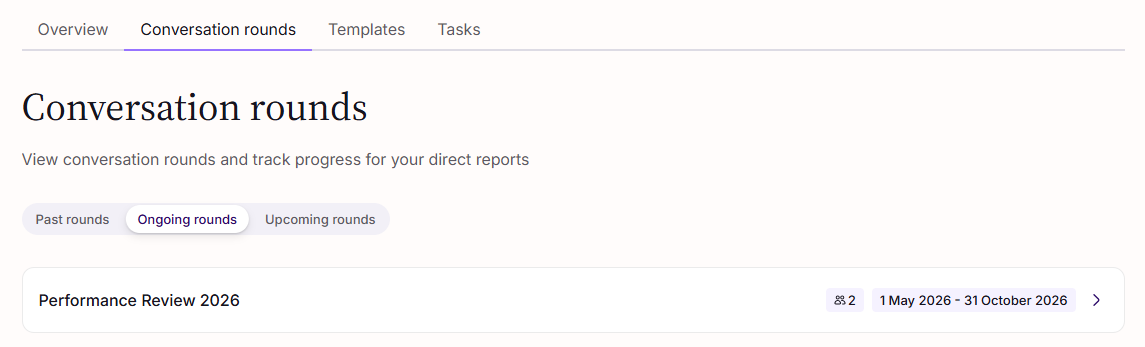
You'll find rounds under the Conversation rounds tab.
Rounds you can see
You see rounds where you have direct reports in scope, organised into:
Ongoing — rounds currently within their date range
Upcoming — rounds whose start date is in the future
Past — rounds whose end date has passed
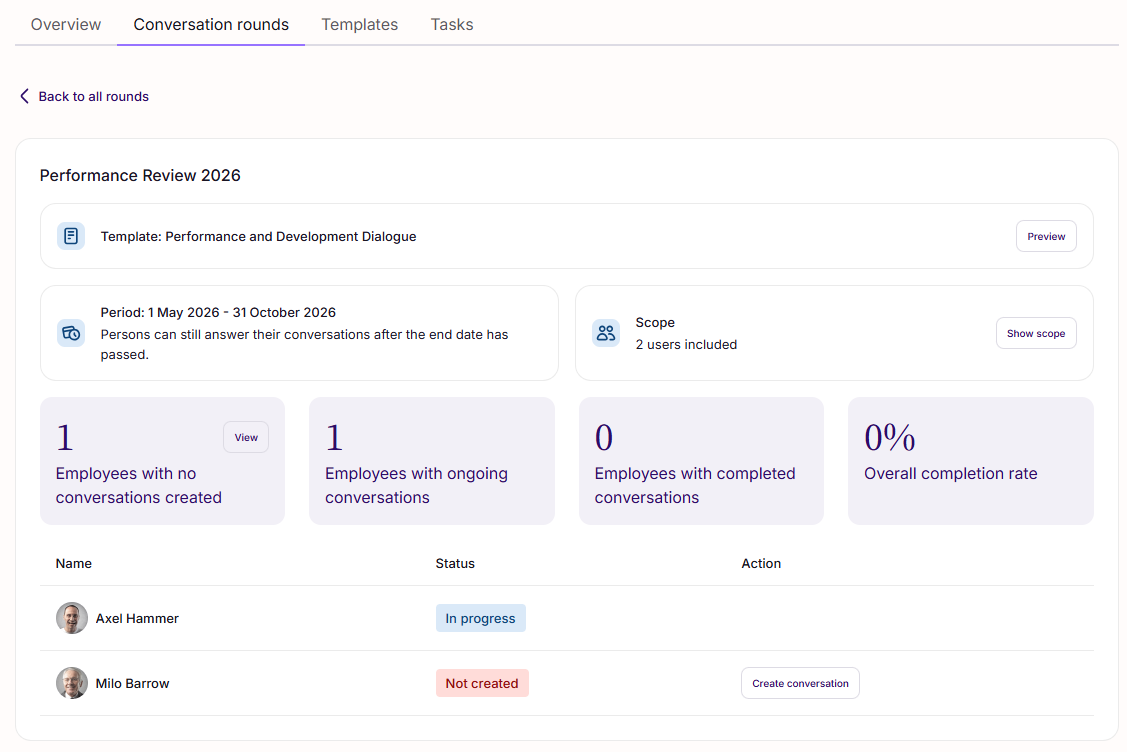
You can open any round to see the details — including the template, time period, and your team's progress.
Creating a conversation linked to a round
There are two ways to create a conversation for a round:
From the Round details page — click Create next to any employee who doesn't yet have a conversation in the round. The conversation is created immediately, using the round's template.
From the Create conversation modal — switch to the Conversation round option and pick the round from the dropdown. The template is pre-filled from the round.
Conversations linked to a round work exactly like ad-hoc conversations from this point on — you and the employee prepare, share, discuss, and close as usual.
Good to know: If an administrator chose Create conversations automatically when setting up the round, all conversations for your direct reports are already created when the round starts. You'll find them in your Team overview.
Tracking your team's progress
The Round details page shows progress for your direct reports who are in scope. You'll see four key numbers:
Employees with no conversation created — direct reports who don't yet have a conversation in this round
Employees with ongoing conversations — direct reports with a conversation that hasn't been closed yet
Employees with completed conversations — direct reports with at least one closed conversation
Overall completion rate — the share of your direct reports with a completed conversation
Below that, you'll see each of your employees with their current status. Click an employee's name to open their conversations.
Changing the round on a conversation
If you created a conversation under the wrong round — or want to link an ad-hoc conversation to a round later — open the conversation, click the More menu, and select Change round. You can pick any round (past, ongoing, or upcoming), or remove the round association entirely.
8. Templates
Templates give you and the employee a shared agenda and structure for the conversation. Both of you see the same discussion points and reflect on them independently.
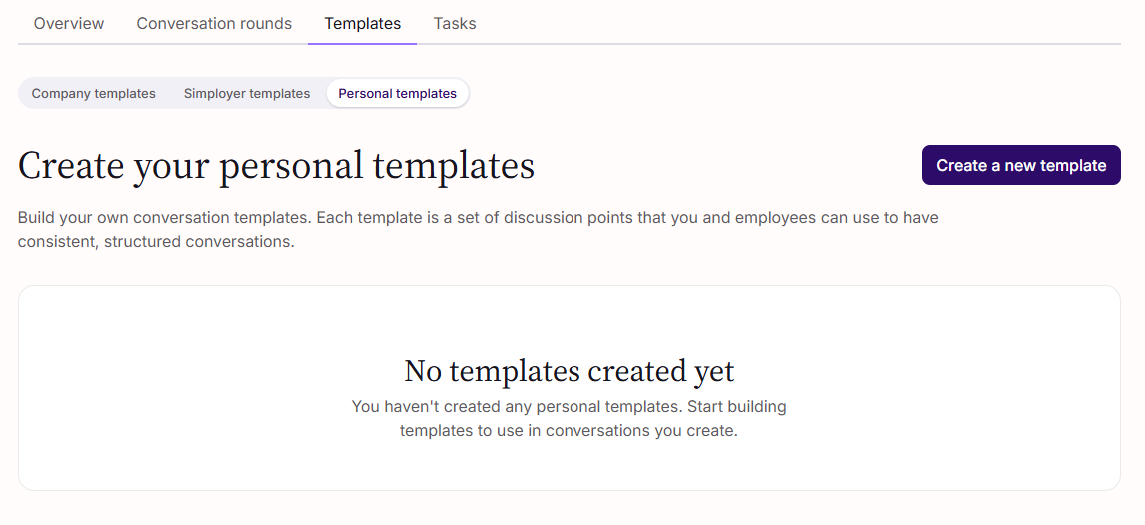
You'll find templates under the Templates tab. You'll see the templates made available to you by Simployer and your administrators, along with your own Personal templates.
 Copying templates
You can copy any template you see to use as a starting point for a new personal template. The copy is pre-populated with all fields from the original, with (Copy) appended to the name. For Simployer templates, the copy uses the language currently displayed. The copy is fully independent from the original — changes to either won't affect the other.
Personal templates
Personal templates are your own — private to you, not visible to other managers, administrators, or employees. They're useful when you want to run a specific kind of conversation repeatedly without depending on what's available organisation-wide.
You can use a personal template when starting an ad-hoc conversation. They aren't available for Conversation Rounds — those always use templates set up by your administrators.
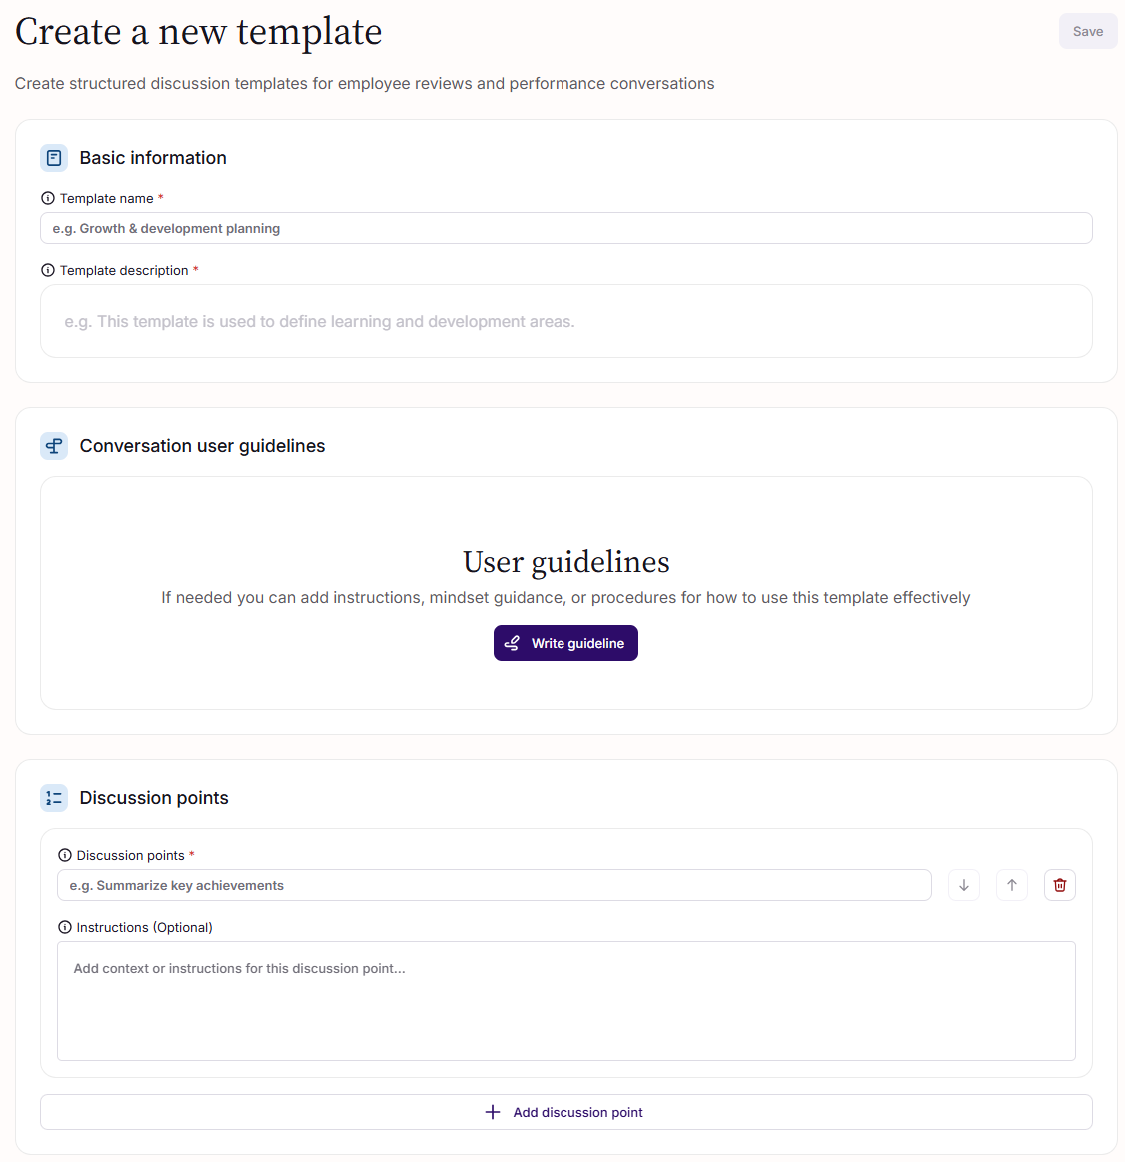
Creating a personal template
Click Create template in the Personal templates segment. A template consists of:
Name (required, must be unique among your personal templates)
Description — explains the template's purpose. Shown when browsing templates, not inside the conversation.
User guidelines (optional) — rich-text content shown to both participants via a Show guidelines button in the conversation. Supports headings, bold, lists, and links.
Discussion points — the prompts both of you reflect on. Add as many as needed and reorder them.
Discussion point instructions (optional) — short guidance shown below a discussion point in the conversation.
Editing, disabling, and deleting
You can edit, disable, or delete your personal templates at any time.
Important: Changes to a personal template only affect conversations created after the change. Conversations that already use the template keep their original content. The same applies if you disable or delete it — existing conversations are not affected.
9. Visibility rules and sharing
By default, a conversation is visible only to its two participants — the employee and the reviewer. There are a few ways to see or share conversations beyond that.
Finding all conversations about an employee
Sometimes you need to see the full picture for one of your direct reports — including conversations they had with previous managers or with other reviewers.
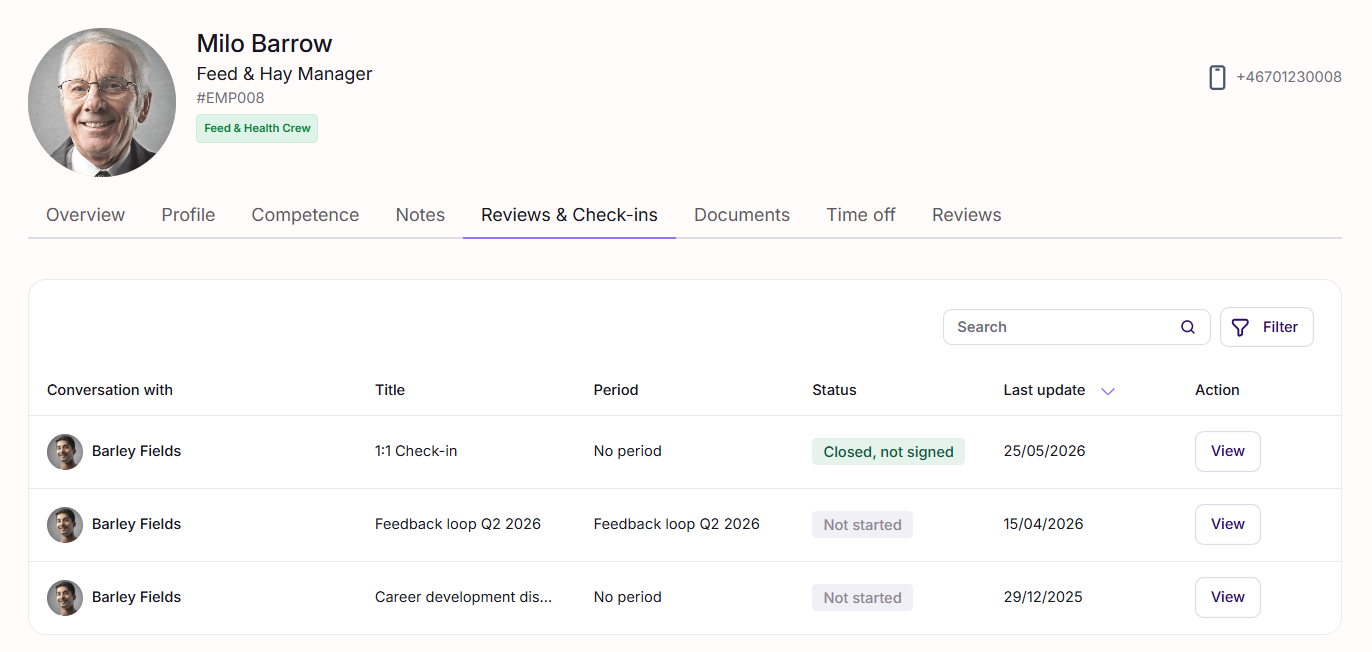
On the employee's profile, open the Reviews & Check-ins tab. It lists all conversations where the employee is the subject, regardless of who the reviewer is.
You can see this tab for:
Your own direct reports
Yourself (your own conversations)
The action button on each row reflects your role in that conversation:
Respond — you're a participant and haven't submitted yet
View — for all other cases
Opening a conversation you weren't part of will prompt you to request access from the employee. Once they approve, you can view the conversation in read-only mode (provided it has been closed). See Requesting and granting access below for details.
Sharing a conversation with another user
You can share a link to a conversation with another user in your organisation — for example, an HR partner or a senior leader who needs to see the outcome.
Open the conversation, click the More menu, and choose Share. Sharing the link itself happens outside the product (email, Slack, Teams, etc.).
The person you share with won't have access automatically — they'll need to request it.
Requesting and granting access
If someone opens a conversation they don't have access to, they'll be prompted to request access. The request goes to the employee — not to you — because the employee owns the visibility of their own conversation.
The employee can approve or deny each request, and can remove access later if needed. Approved viewers can read the conversation only once it's been closed.
Deleting a conversation
You can delete a conversation you created or where you're the reviewer. Open the conversation, click the More menu, and choose Delete conversation.
Conversations in any status can be deleted, including ones with submitted responses.
If the conversation already has answers, you'll see an extra confirmation before it's deleted.
The employee is not notified about the deletion.
If you deleted a conversation by mistake, open the same link again — you'll see a Restore button that brings it back.
Was this article helpful?
That’s Great!
Thank you for your feedback
Sorry! We couldn't be helpful
Thank you for your feedback
Feedback sent
We appreciate your effort and will try to fix the article