Connect Teamtailor to Simployer One to import candidates marked as Hired in Teamtailor and continue with Document E-signing or onboarding in Simployer.
The Teamtailor integration lets you import hired candidates from Teamtailor into Simployer One. To get started, create a Teamtailor Admin API key with read permission and connect the two systems. Once configured, candidates become available for import when they are marked as Hired in Teamtailor.
Who can set up the Teamtailor integration in Simployer One?
To connect Teamtailor to Simployer One, you need the following permissions:
Simployer One: You must be an Owner.
Teamtailor: You must be an admin user.
How do I create a Teamtailor API key for Simployer One?
Before connecting Teamtailor to Simployer One, create an API key in Teamtailor.
Sign in to Teamtailor as an admin user.
Go to Settings > Integrations > API.
Create an Admin API key with read permission. You can choose any name for the API key.
Copy the API key. You will need it when configuring the integration in Simployer One.
Note: If you need help finding or creating an API key, see the Teamtailor Help Center.
How do I connect Teamtailor to Simployer One?
Once you have created the Teamtailor API key, you can configure the integration in Simployer One.
Sign in to Simployer One as an Owner.
Go to Settings > Integrations.
In the Integrate with ATS system section, click Add integration.
Select Teamtailor, then click Next.
Paste your Teamtailor API key into the API key field.
Choose the default import status: Candidate or New hire.
Click Save.
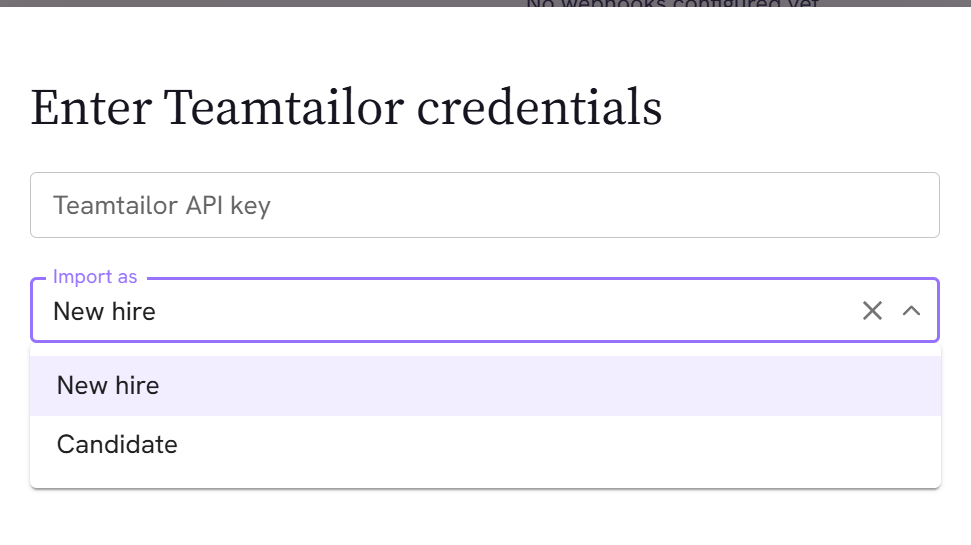
Once the integration is configured, candidates marked as Hired in Teamtailor become available for import into Simployer One.
Should I choose Candidate or New hire as the default import status?
When configuring the Teamtailor integration, choose whether imported people should be created as Candidate or New hire in Simployer One.
Candidate: Choose this option if you use Document E-signing in Simployer One. This allows you to sign a contract with the candidate before starting onboarding.
New hire: Choose this option if you do not use Document E-signing in Simployer One. The contract is signed outside Simployer One, and you can then start onboarding the person in Simployer One.
The selected option determines the default status assigned to people imported from Teamtailor.
When does a Teamtailor candidate become available for import?
A candidate becomes available for import into Simployer One when you move them to the Hired column in Teamtailor.
Candidates who have not been marked as Hired in Teamtailor do not appear as new candidates ready for import in Simployer One.
Important: The Teamtailor integration must be configured in Simployer One before you can import candidates.
How do I import a hired candidate from Teamtailor to Simployer One?
Once a candidate has been marked as Hired in Teamtailor, you can import them into Simployer One.
In Simployer One, go to Employees.
Click Teamtailor in the upper-right corner to open the Teamtailor import page.
Open the New tab to find candidates who have been marked as Hired in Teamtailor but have not yet been imported into Simployer One.
Click Create to the right of the Teamtailor user you want to import.
Select the checkbox to the left of the Teamtailor user.
Click Import in the upper-right corner.
The imported person is assigned the default status selected when the Teamtailor integration was configured: Candidate or New hire.
What do the tabs on the Teamtailor import page show?
The Teamtailor import page in Simployer One contains three tabs:
New: Candidates marked as Hired in Teamtailor who have not yet been imported into Simployer One.
Imported: Candidates marked as Hired in Teamtailor who have already been imported into Simployer One.
All: All candidates that exist in Teamtailor.
Which candidate fields are imported from Teamtailor to Simployer One?
When you import a candidate from Teamtailor, the following information is mapped to Simployer One:
| Teamtailor field | Simployer One field |
|---|---|
| Personal - Private email | |
| First name | Personal - First name |
| Last name | Personal - Last name |
| Phone | Personal - Private phone |
| Employee title | Work - Title |
| Avatar URL | Employee avatar image |
Note: If the employee title from Teamtailor does not exist in Simployer One, Simployer One creates it as a new job title and assigns it to the imported person.
You can manage job titles under Settings > Job titles in Simployer One.
What should I do after importing a candidate from Teamtailor?
The next step depends on whether the person was imported as Candidate or New hire in Simployer One.
If the person was imported as New hire
If the person was imported as New hire, you can continue onboarding in Simployer One.
Go to Employees > New hires.
Find the imported person.
In the Status column, click Resume onboarding.
Continue the onboarding process and invite the person to Simployer One.
If the person was imported as Candidate
If the person was imported as Candidate, you can start Document E-signing or update their profile before signing.
Go to Employees > Candidates tab.
Find the imported candidate.
Click the three dots > Edit to update the candidate's information before starting Document E-signing. Save.
Click Start signing process to begin Document E-signing.
How do I edit an imported Teamtailor candidate before Document E-signing?
If you imported a person from Teamtailor as Candidate, you can update their profile in Simployer One before starting Document E-signing.
Adding information to the candidate profile can help Simployer One automatically retrieve more candidate information when creating the e-signing document.
Go to Employees > Candidates.
Find the candidate, click the three dots to the right of their name, and select Edit.
Open the Profile tab.
Click the pen icon in the section where you want to update information.
Add or update the information, then click Save.
To change the candidate's language:
Open the Account tab on the candidate's profile.
Select the preferred language from the drop-down list.
Click Update language.
You can then proceed with Document E-signing.
Was this article helpful?
That’s Great!
Thank you for your feedback
Sorry! We couldn't be helpful
Thank you for your feedback
Feedback sent
We appreciate your effort and will try to fix the article